


In a world where tone- expression knows no bounds, nail art stands as a testament to creativity and individuality. Learning the art of intricate designs or perfecting the steady hand demanded for traditional nail oil painting can constantly feel like a fugitive feat. Enter nail wraps - the game-changer in the realm of manicure magic. With their easy operation and stunning results, nail wraps offer a gateway to effortlessly chic nails for beginners and seasoned nail enthusiasts alike.
And how to apply nail wraps? In this step-by-step companion, Nghia Nippers will unravel the secrets behind impeccable nail mantle operation, empowering you to unleash your inner nail artist with confidence and faculty. So, let's embark on this trip together and discover the beauty and simplicity of applying nail wraps.
1. Beauty of nail wraps
Nail wraps are a revolution in the world of nail art, offering an accessible and versatile way to express creativity and style. These tenacious stickers come in an array of designs, colors, and patterns, allowing individualities to customize their manicures to suit any mood or occasion.

Suppose of nail wraps as a lower high- conservation interpretation of press- on nails; if you've ever endured the low- crucial trauma of showing up to your destination with a missing press- on, you will take comfort in knowing that wraps offer more security, especially when doing effects like digging in your bag for lip oil painting or baptizing your hair.
The stylish part about nail stickers is that there’s zero drying time and you do n’t need to be ambidextrous or a trained nail artist to pull off a clean and quick at- home manicure. You can literally pop them on while you are watching television.
Nail wraps, on the other hand, act as stickers, but utmost are made out of factual gel nail polish. The tenacious backing sticks to your natural nails and also you just file off the edge to fit your nail shape. They frequently need to be cured with a UV beacon to heat up the tenacious backing and really stick.
Junking varies per tackle, but utmost can be hulled off by hand or with a rustic stick. When applied duly, nail wraps can also be long- continuing — we're talking up to two weeks — and are less dangerous to your nails in the long run than paintings or traditional gel manicures. And numerous brands offer options in both solid colors and patterns for whatever main mood you are in.
So whether you ’re looking to try the mismatched nails trend or want a faster way to get your go- to neutral, there’s a nail serape to go on with it. Ahead, find the best nail wraps and stylish nail stickers to meet all of your easy and affordable manicure requirements.
The beauty of nail wraps lies in their capability to offer royal fineness and creativity at your fingertips. Whether you're a nail art sucker or a beginner looking to elevate your manicure game, nail wraps are a must- have accessory that allows you to showcase your personality and individuality with every swipe of polish. So why stay? Embrace the beauty of nail wraps and let your nails come to your oil painting for tone- expression and style.
>>> Related News: How to sanitize nail clippers
2. Tools and materials
Before diving into the world of nail wraps, it's essential to gather the necessary tools and paraphernalia to ensure a smooth and successful operation process. There is a comprehensive list of what you'll need.
- Nail Wraps: Serving as the pièce de résistance, nail wraps offer an extensive array of designs, colors, and finishes to feed to every taste and preference. With options ranging from bold patterns to subtle stresses, there's a nail mantle to round any style. These versatile wraps are available in various shapes and sizes, icing a perfect fit for different nail beds.
- Nail train: An necessary tool in your nail attack, a high- quality nail train is consummate for perfecting the edges of the nail wraps. concluding for a fine- fibre train is vital to help planing the nail face and to ensure an impeccable finish. With gentle yet precise strokes, the nail train facilitates the shaping and smoothing process, performing in an indefectible and polished manicure.
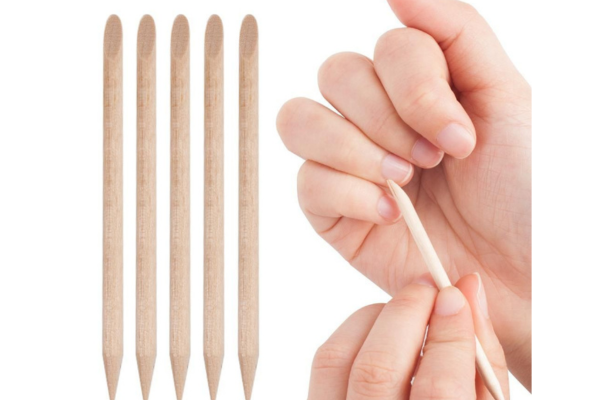
- Cuticle Pusher or Orange Stick: Incorporating a cuticle pusher or an orange stick into your nail drug routine is largely salutary. By delicately pushing back the cuticles before applying the nail wraps, you produce a pristine nail bed that promotes superior adhesion. This scrupulous step not only ensures a clean and tidy appearance but also enhances the life of your manicure.
- Nail Polish: Way used to the operation of the nail wraps, it's essential to cleanse the nails fully with nail polish. This vital step eliminates any moping traces of oil painting oil or residue, thereby maximizing the adherence of the nail wraps and extending their life. By rigorously removing any walls to adhesion, you lay the foundation for an indefectible and enduring manicure.

- Top Coat: While not obligatory, applying a top fleece over the nail wraps can help seal and cover the design, precluding dicing and extending the manicure's lifetime. Choose a clear top fleece with a lustrous or dull finish, depending on your preference.
- Nail Prep Solution: Some nail wraps accoutrements come with a nail fix result or tenacious manual to enhance adhesion and longevity. However, follow the manufacturer's instructions for optimal results, If included.
- Nail Polish: If asked , you can round the nail wraps with coordinating nail polish colors to produce unique accentuation nails or add redundant embellishments.
- Cotton Pads or Balls: These are handy for applying nail polish and drawing up any redundant polish or glue during the operation process.
- Nail Clippers: Should you find your nails longer than asked , employing nail clippers to trim them to your preferred length previous to applying the nail wraps is recommended. This ensures a more comfortable fit and a polished appearance for your manicure.
- Nail Buffer: A gentle nail buffer can help smooth out any unevenness or crests on the nail face, furnishing a smooth oil for the nail wraps.
By gathering these essential tools and accoutrements , you will be well-equipped to embark on your nail serape trip with confidence and ease. Whether you are a freshman or a seasoned nail sucker, having the right inventories at your disposal is crucial to achieving professional- looking results and showcasing your creativity on your fingertips.
3. How to apply nail wraps?
Applying nail wraps may feel dispiriting at first, but with the right ways and a bit of practice, you will achieve ineffective results every time. Follow these step-by-step instructions to master the art of nail serape operation.
3.1 Selecting the right size
Before you begin, it's pivotal to elect the correct size nail serape for each nail. utmost nail serape accoutrements come with a range of sizes to accommodate different nail shapes and sizes. To ensure a proper fit, compare the range of the nail serape to the range of your nail bed. Choose a serape that nearly matches the range of your nail without lapping the skin or cuticles.
You can trim the edges of the nail serape with scissors to acclimate the size and shape to fit your nails impeccably, If necessary. still, avoid trimming too much, as this can affect the overall appearance and adhesion of the serape .
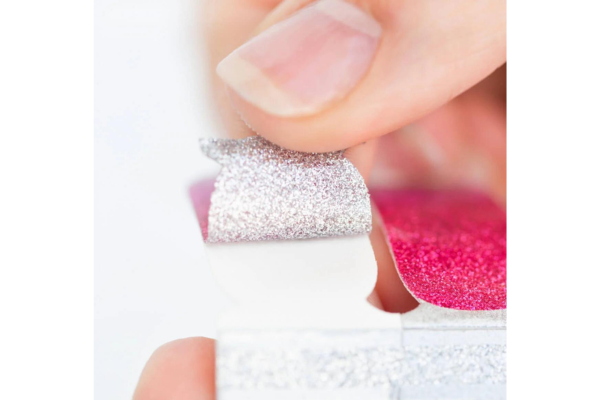
3.2 Peeling and positioning
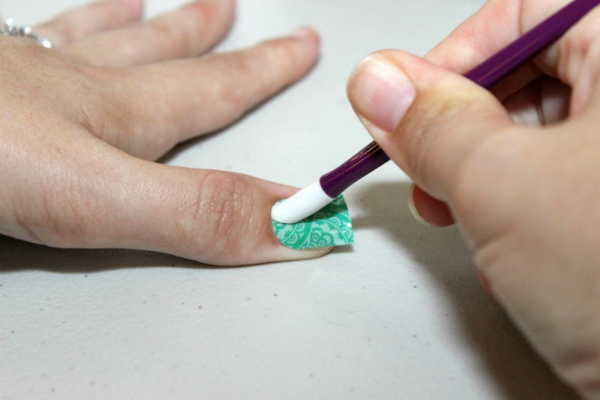
Once you've named the right size nail serape , precisely peel it from its backing using a cuticle pusher or your fingertips. Be gentle to avoid tearing or stretching the serape . Hold the serape near the base to help it from entwining or sticking to itself.

Next, align the twisted edge of the nail serape with the base of your nail, just above the cuticle. sluggishly smooth the serape over the face of your nail, working from the base to the tip. Use gentle pressure to insure the serape adheres easily without any wrinkles or air bubbles.
Gently lift it off the nail and try again, If you make a mistake or need to budge the serape. Nail wraps are forgiving and can be acclimated fluently during the operation process.
3.3 Smoothing and shaping
Once the nail serape is in place, use a soft cloth or your fingertips to smooth out any air bubbles or wrinkles. Start from the centre of the nail and gently press outward towards the edges to ensure a secure bond.
Use a nail train to trim the redundant material, If the nail serape extends beyond the tip of your nail. train in a downcast stir to avoid lifting or damaging the serape. Alternatively, you can fold the redundant serape over the edge of the nail and file it flush with the tip for a flawless finish.
3.4 Filing and finishing
To further upgrade the shape and appearance of the nail serape , use a nail train to gently buff and smooth the edges. Pay attention to any rough or uneven areas, and file them down until the serape blends seamlessly with your natural nail.
Once you are satisfied with the shape and appearance, apply a clear top fleece over the nail serape to seal and cover the design. This step not only adds shine but also helps protract the wear and tear time of the nail serape and prevents dicing or shelling.
With these step- by- step instructions, you will be suitable to apply nail wraps like a pro and achieve professional- looking results from the comfort of your own home. Flashback to take your time, exercise tolerance, and enjoy the creative process of beautifying your nails with stunning designs and colours.
4. Conclusion
Learning the art of applying nail wraps isn't only attainable but also incredibly satisfying. How to apply nail wraps? Guided by Nghia Nippers as mentioned above, as you refine your skills through practice and patience, you will unlock endless possibilities for creating mesmerizing nail designs.
Embrace the versatility of nail wraps by exploring a vast array of colors, patterns, and styles, allowing your imagination to run wild. Elevate your manicure game to new heights and express your unique personality through your nails. So, seize the occasion, indulge in the creative process, and proudly showcase your impeccable nail art to the world.
>>> Read more: How to sharpen nail clippers


